January 29, 2013

Zip Dry Resist Tutorial

So glad to be finally feeling better. Seriously, I thought the bronchitis was bad enough, but when I developed an upper respiratory infection -- geez! I just couldn't seem to shake that thing. I still have a little cough, but I can totally live with that.

Enough about me. I thought I'd share this tutorial that I created for Scrap 'n Art Magazine. If you enjoy creating unique backgrounds then you'll love this Zip Dry Resist technique. The end results looks like it might be complicated, but it's both easy and fun to do. The hardest part is being patient while the glue dries.

Supplies used:


1.  Squeeze Zip Dry up and down one side of white cardstock.  Slightly smear the Zip Dry with your finger.


2.  Let it dry completely before moving to the next step. (Resist the temptation to use a heat gun.)


3.  When glue is dry, use blending tool to rub ink (I used Ranger Archival Ink - Saffron) onto white cardstock.  A non-stick craft sheet is helpful for this step, as it makes it easier to blend in circular motions onto the cardstock.


4.  Repeat this step until the card is completely covered with ink.  Use a cloth or paper towel to wipe ink from dried Zip Dry.


5.  Use pens to apply color to the stamp. If you are using only one color, then use a stamp pad.


6.  Stamp image onto inked cardstock.  Continue applying color and stamping until desired effect is achieved.


 7.  Adhere ribbon to stamped cardstock, then adhere to layered colored cardstocks. Next adhere layers to card base and and flower to ribbon.


8.  Add Liquid Pearls to center of flower.


9.  Voila!


Supply List:

Adhesive: Beacon Adhesives Zip Dry; Cardstock: Stampin’ Up! “Elegant Eggplant, Old Olive”; Embellishments: Kaisercraft “Flowers Violet”; Ink: Ranger Alcohol Ink “Saffron”; Paint: Ranger LiquidPearls “Buttercup”; Pens: Stampin’ Up! Stampin’ Write “Always Artichoke, Elegant Eggplant”; Ribbon: Offray; Stamps: Unity Stamp Company “Donna Downey Insightful Meadows”; Tools: Martha Stewart “Paper Trimmer”; Tonic Studios “Tim Holtz Scissors”; Misc: Cardstock off white

January 14, 2013

Dreaming of Summer

Baby, it's cold outside!  Please don't let Punsxutawney Phil see his shadow next month!

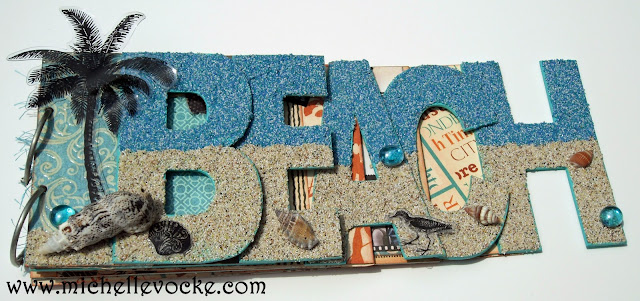
Today I thought I'd share something that makes me think of sunshine on this cold winter night -- the beach!


 I had fun making this word album using Mudd PuddlesGraphic 45 On the Boardwalk paper collection, Tattered Angels Glimmer Glass Transparent Overlays - Seaside Sea Glass, Glimmer Mist, Ranger Inkssenstials Glossy Accents, Tim Holtz Distress Ink pad, Bazzill cardstock, assorted sea shells and glass pieces, lace and ephemera.

Stay warm!

January 09, 2013

Crops on the horizon

Looking for a list of upcoming crops? Well look no further because I have published a list!

I LOVE to go to crops because I enjoy catching up with old friends, meeting new friends, looking at people's projects and, when I have the opportunity, I enjoy teaching classes at crops.

You don't always have to do traditional scrapbooking at crops.  Many people make cards, knit, digital scrapbook, work on art journals, make jewelry, create canvas art.... The possibilities are endless when you have dedicated time and space to work on your projects.

One of my favorite crops is Weekend Memories. Everyone always has a great time, mostly due to the atmosphere created by the owner, Mirella Arroyo.

Hanging out with Connie and Mirella at Weekend Memories

I did something different at December's crop.  Thanks to my good friend Kaye, I spent my time downloading digital stamps and coloring the images with my Copic Markers.

Had a blast coloring with Kaye
If you want to see a slideshow of pics from the crop there is posted in the article about upcoming crops.

Looking forward to going to more crops and creating more classes this year!

January 06, 2013

New Beginning

THRILLED! -- that's how I feel about my new blog! It truly is a new beginning for me both personally and creatively. But before I go on, I want to give a big THANK YOU and shout out to blog designer extraordinaire Madeline Mele, Owner of The Shabby Vanity. Working with Madeline has been an absolute joy and I am thrilled to pieces at all that she has created for me.

For those of you that follow my blog, you may have noticed that all of the blog posts from my old blog are not archived on this blog. This is because I truly want to have a fresh start -- a new beginning. But don't worry, I will post some of the projects that I created in the gallery.

Thank you to my family, friends and fellow crafters who have been there for me this past year while I muddled through my illness. I am so glad to be feeling better and I am thrilled to get back to writing and creating again!